
Class Calendars are created to handle events where multiple people can attend a single booking. These calendars work well for webinars, workshops, training sessions, and sports events. In a Class Calendar, there can only be one appointment owner, typically the trainer or host. The number of spots per slot can be set, with a maximum limit of 9,999 attendees, although meeting location restrictions apply.
What is a Class Booking?
A class booking is a one-to-many type calendar to host multiple invitees in a single booking. Class bookings are helpful when you want various invitees to attend a single event at once; some examples, but not limited to:
Webinars/Workshops
Training Sessions
Sports Events
Why use Class Booking Calendars?
Using Class Calendars offers several benefits for managing events with multiple attendees, such as:
- Efficient organization: Class Calendars simplify organizing and managing one-to-many events by allowing you to create a single booking that accommodates multiple invitees, streamlining the scheduling process.
- Customizable capacity: You can set the number of spots per slot to control the class size and ensure an optimal learning or participation environment.
- Centralized management: Class Calendars provide a centralized platform to manage bookings, cancellations, and rescheduling, making it easier for the appointment owner to oversee all aspects of the event.
- Enhanced communication: Class Calendars facilitate better communication with attendees by providing a clear overview of event details, such as date, time, and location. This helps reduce confusion and the likelihood of no-shows.
- Time-saving: Class calendars save time for both the organizer and the attendees by automating the booking process and providing options for attendees to cancel or reschedule their appointments.
How do you set up a Calendar for Class Bookings?
1. Within your Sub-Account, head to Settings

2. Click on Calendars

3. Click on Create Calendar

4. Click on Select under Class Booking

5. At least One Team Member needs to be added before the calendar can be saved
In the case of a class or a training session, the appointment owner would be the trainer. You can add the appointment owner by clicking Add User and selecting the User from the dropdown list. , UserUser
Please Note:
You can select only one Appointment Owner for a Class Booking calendar.

6. Enter a Name for your Calendar

7. Enter a Description for your Calendar

8. Enter a Calendar URL Slug
Please Note:
This must be a unique slug that is not being used for another Calendar.

9. You are limited to using the Neo Widget type for Class Calendars

10. Click on Save & Continue

11. Proceed to the Availability tab.

For your class booking, you can choose the number of attendees you'd like to have at each event.

For example, if you set the maximum number of seats per slot to 10, then up to 10 invitees can book a single time slot. For example, ten attendees can book a class or training session at 1:00 PM.
You can choose up to 9,999 attendees in a single slot; however, if you use a conferencing tool, the tool may have a different maximum attendee limit. For example, Zoom offers a maximum of 500 attendees for certain licenses. specific
Cancellation and Rescheduling
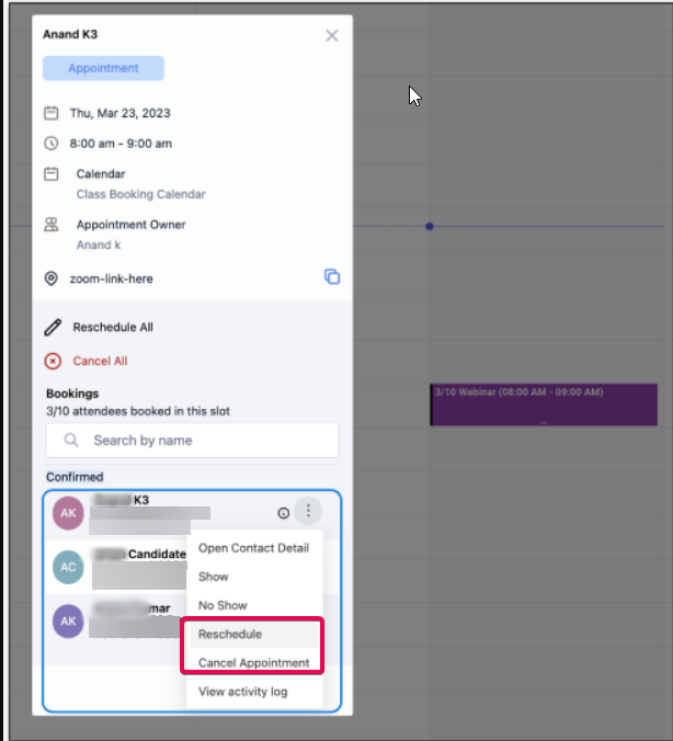
To cancel a class booking, open the appointment and click "Cancel All." To reschedule the meeting, click "Reschedule All," which would reschedule the appointment for all the attendees.

To cancel or reschedule the appointment for a particular attendee, click on the options next to the attendee from the list to see the Cancel and Reschedule option, which would cancel or reschedule the appointment for that specific attendee.
Please Note
If you have third-party calendars like Google Calendar or Outlook integrated with the CRM's calendar, then the class booking would show each appointment separately in your Google or Outlook calendar.
Example: If you create a class booking with a capacity of 5 attendees, it will appear on the Google or Outlook calendar as 5 separate events at the same time.
The meeting location for Class Booking is now restricted to Custom. This would be removed in the near future.
FAQs
Question: How can I cancel or reschedule a class appointment?
Answer: To cancel or reschedule the class booking, you can go to calendars, click on the class booking you want to modify, and you can see the option to edit/change the appointment.
Question: Can I cancel or reschedule a class appointment for a single attendee?
Answer: Yes, for class appointments, you can click the options menu next to the contact, where you can see the option to cancel or reschedule the appointment for specific contacts.
Question: Can I book a class appointment with contacts directly?
Answer: Yes, you can do that; click on the "book appointment" button and select the contact you want to book the appointment with. Then select the calendar (choose the class booking calendar here), select the slot, and then proceed to book the appointment. to select
Question: Can attendees cancel/reschedule a Class Booking appointment?
Answer: To allow attendees to cancel or reschedule the class booking appointment, enable the "Allow Cancellation" and "Allow Reschedule" options in the Confirmation Tab in Calendar Settings.


