
Importing files into our system is straightforward if you follow the guidelines and steps outlined below. This document will help you ensure a smooth and successful import process.
Only admins have permission to import files into the system
Sample File for importing or updating contacts: Sample file
Prepare Your Data
Supported File Types
- Ensure your file is in .csv format.
File Preparation Requirements
- Sheet: Only one
- Size: Smaller than 30 MB
- Headers: Include a header row with at least one column corresponding to a standard or custom field in the system. Note that all your custom fields should be created in the system before starting your first import.
Please note that only new contacts import can be reverted but updating contacts is not a reversible action
Mandatory Fields
1. For Creating Contacts: Either of Contact Name, Phone, or Email
2. For Updating Contacts: Contact ID, Name, Email, or Phone (as per the Duplicate Settings set for the account)
Understanding Import Options
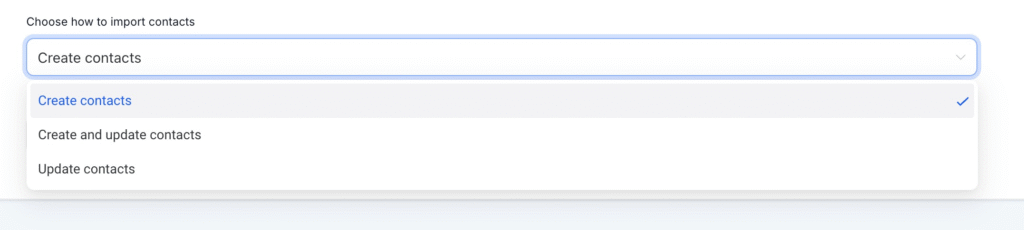
When importing objects, you have three options to choose from:
- Create Opportunities: Use this option to upload only new records into the system.
- Update Opportunities: Select this option to update information for existing records.
- Create and Update Opportunities: Choose this option for a combination of adding new records and updating existing ones.
Structuring Your File
Field Formatting
- Date Picker:
- Acceptable formats: mm/dd/yyyy (e.g., 10/28/2020), yyyy/mm/dd (e.g., 2020/10/28), mm-dd-yyyy (e.g., 10-28-2020), yyyy-mm-dd (e.g., 2020-10-28).
- Acceptable formats: mm/dd/yyyy (e.g., 10/28/2020), yyyy/mm/dd (e.g., 2020/10/28), mm-dd-yyyy (e.g., 10-28-2020), yyyy-mm-dd (e.g., 2020-10-28).
- Multiple Options, Checkbox, Textbox List:
- Acceptable formats: Value 1, Value 2, Value 3 (e.g., Blue, Yellow, Green). You can also use; or . as separators.
- Acceptable formats: Value 1, Value 2, Value 3 (e.g., Blue, Yellow, Green). You can also use; or . as separators.
- Radio, Single Option:
- Acceptable formats: Value 1 (e.g., Blue).
- Acceptable formats: Value 1 (e.g., Blue).
- Contact Owner:
- Format: FirstName LastName (e.g., Logan Paul).
- Format: FirstName LastName (e.g., Logan Paul).
- Tags:
- Acceptable formats: Value 1, Value 2, Value 3 (e.g., Blue, Yellow, Green). You can also use; or . as separators.
- Acceptable formats: Value 1, Value 2, Value 3 (e.g., Blue, Yellow, Green). You can also use; or . as separators.
- Phone Number:
- Format in E.164 (e.g., +1 1234567890). For US numbers, formats like 123-456-7890 or (123) 456-7890 are also acceptable.
- Format in E.164 (e.g., +1 1234567890). For US numbers, formats like 123-456-7890 or (123) 456-7890 are also acceptable.
- Numerical:
- Acceptable formats: 1.23, 1234, .123.
- Acceptable formats: 1.23, 1234, .123.
- Monetary:
- Acceptable formats: 1234, 1,234,234.33.
- Acceptable formats: 1234, 1,234,234.33.
- Contact Followers:
- Acceptable format: FirstName LastName, FirstName2 LastName2 (e.g. Adam Smith, David Lee)
- Acceptable format: FirstName LastName, FirstName2 LastName2 (e.g. Adam Smith, David Lee)
- Additional Email Addresses:
- If you're importing contacts with more than one email address, include an Additional email addresses column with their secondary emails.
- Acceptable format: abc@email.com, abc1@email.com
- Additional Phone Numbers:
- If you're importing contacts with more than one phone number, include an Additional phone numbers column with their secondary phone numbers.
- Acceptable format: +1 7877123460,+1 7877123461
Importing Your File
Steps to Import:
1. Go to Contacts
2. On the top row with multiple actions - click on "Import Contacts"

3. Choose to import only Contacts or both.
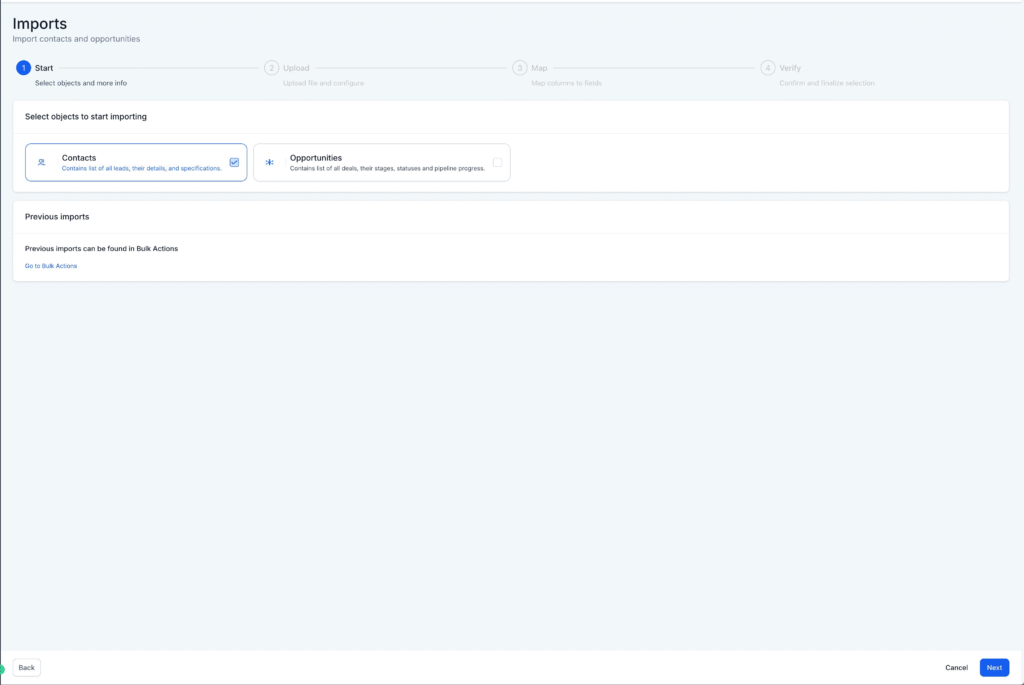
4. Upload the file for importing and then click on "Choose how to import contacts" to decide whether you want to create, update, or do both.
De-duplication preferences are respected for finding and creating new contacts.
5. Map Your Fields: Ensure each column in your file is correctly mapped to the corresponding field in the system.
Adjust the mappings if necessary.
A few things to note:
- Checking the "Don't update Empty Values" checkbox will not update any field if the imported file has empty values, and the field does have some value for the opportunity
- If you decide not to import a specific field, you can choose to keep it unmapped and check the box at the bottom to proceed. -"Please ensure all mandatory fields are mapped. To proceed, either map all fields or choose Don't import data for unmapped columns."

6. Review and Confirm: Review the data preview to ensure everything looks correct. Confirm the import to proceed.
Note that it is mandatory to check the box at the bottom and accept the disclaimer to start importing.
You can also add tags to the corresponding contacts for these opportunities on this screen.

7. Monitor the Import: Check the import progress under Opportunities > Bulk Actions. If any errors occur, refer to the error messages provided for guidance on fixing them.

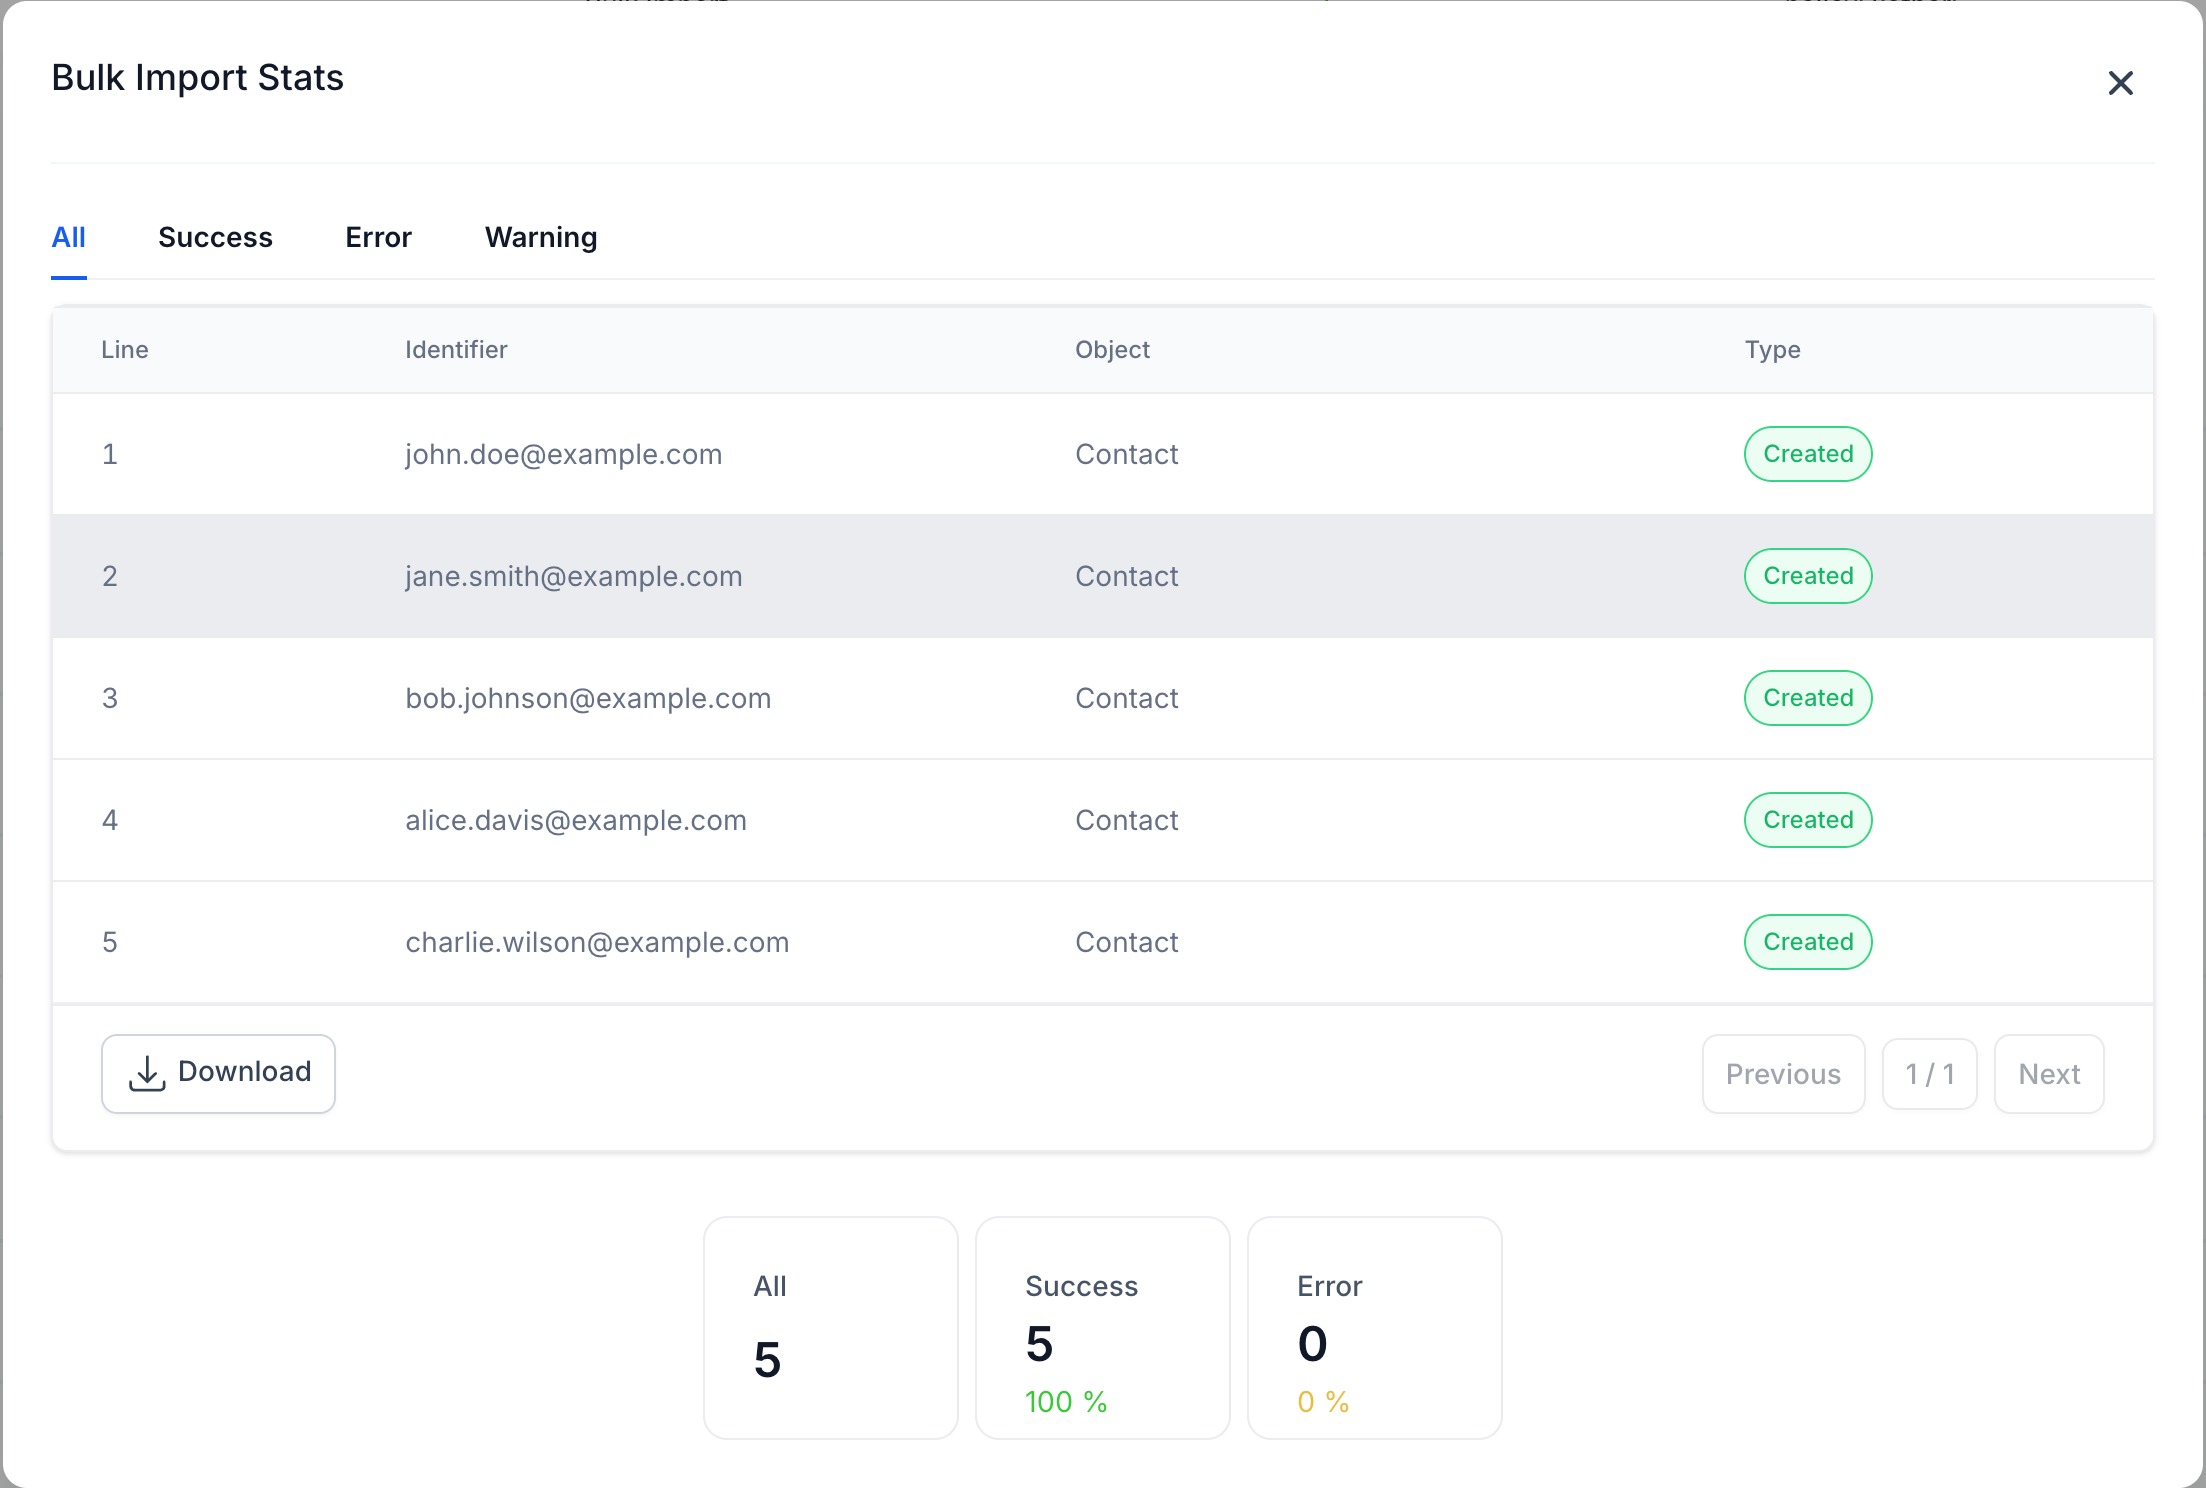
8. Monitor stats, errors, and warnings by clicking on the "Show Stats" button for any import.
Errors: Failures in mandatory fields, which cause the import to fail for that row
Warnings: Failures in optional fields where the import happens for that row, but that specific field is not updated.
Troubleshooting Common Errors
- Error: Required fields to create/update contacts are missing
Solution: To successfully develop contacts while importing:- At least one of the following fields is mandatory for creating a new contact: Name, Phone, or Email. Ensure these fields are included in your CSV and mapped correctly during the import process.
For updating contacts: - Verify your de-duplication settings under Settings > "Allow Duplicate Contacts".
- Depending on the setting, contacts are identified using Contact ID, or a combination of Phone and Email. Include and map these fields for a successful update.
- At least one of the following fields is mandatory for creating a new contact: Name, Phone, or Email. Ensure these fields are included in your CSV and mapped correctly during the import process.
- Error: Duplicate phone found / Duplicate email found
Solution: This error occurs when the import tool detects a duplicate phone number or email address in your file, based on your de-duplication settings.- Verify your de-duplication settings under Settings > "Allow Duplicate Contacts".
- If your settings restrict duplicates based on phone or email:
- Update the phone number or email in your file to make it unique.
- Alternatively, adjust the de-duplication setting to allow duplicate contacts regardless.
- By ensuring the file aligns with your de-duplication settings or updating the settings, you can complete the import successfully.
- Error: Contact is not valid or not in your sub-account
Solution: This error occurs when the Contact ID provided in the import file is either:- Not part of the current sub-account.
- Invalid or associated with a deleted contact.
- To solve this -
- Verify the Contact ID in your file matches a valid contact in the current sub-account.
- If the contact has been deleted, retrieve the correct and current Contact ID for the record.
- Update your file with the valid Contact ID and map it correctly during the import process.
- By ensuring the Contact ID is accurate and belongs to the sub-account, you can complete the import or update.
- Error: Could not read the phone number
Solution: For the vast majority of cases, as long as you format the phone numbers in E.164 (Ex, +1 1234567890), our system will recognize it as valid- irrespective of the default Country picked at the sub-account level
Additionally, if you have set the Country to the US, the following would work perfectly fine as well - 123-456-7890
- (123) 4567890
- 1234567890
- Furthermore, suppose you are working with international numbers (Outside the US). In that case, we'd encourage you to visit: https://libphonenumber.appspot.com/ and run your phone number format by the tool in conjunction with the country code to ascertain its appropriateness for upload.
- Error: Could not read the date
Solution: Ensure that the dates in your file conform to one of the following supported formats:- YYYY-MM-DD (e.g., 2024-09-08 or 2024-9-8)
- YYYY/M/D (e.g., 2024/09/08 or 2024/9/8)
- YYYY.MM.DD (e.g., 2024.09.08 or 2024.9.8)
- M.D.YYYY (e.g., 09.08.2024 or 9.8.2024)
- M/D/YYYY (e.g., 09/08/2024 or 9/8/2024)
- M-D-YYYY (e.g., 09-08-2024 or 9-8-2024)
- YYYY/MM/DD (e.g., 2024/09/08)
- MM/DD/YYYY (e.g., 09/08/2024 or 9/8/2024)
- MM-DD-YYYY (e.g., 09-08-2024 or 9-8-2024)
- MM.DD.YYYY (e.g., 09.08.2024 or 9.8.2024)
- DD MMM YYYY (e.g., 08 Sep 2024 or 8 Sep 2024)
- MMM DD YYYY (e.g., Sep 08 2024 or Sep 8 2024)
- YYYY MMM DD (e.g., 2024 Sep 08 or 2024 Sep 8)
- DD-MMM-YYYY (e.g., 08-Sep-2024 or 8-Sep-2024)
- MMM-DD-YYYY (e.g., Sep-08-2024 or Sep-8-2024)
- YYYY-MMM-DD (e.g., 2024-Sep-08 or 2024-Sep-8)
- DD MMM, YYYY (e.g., 08 Sep, 2024 or 8 Sep, 2024)
- MMM DD, YYYY (e.g., Sep 08, 2024 or Sep 8, 2024)
- DDth MMM YYYY (e.g., 08th Sep 2024 or 8th Sep 2024)
- MMM DDth YYYY (e.g., Sep 08th 2024 or Sep 8th 2024)
- DDth MMM, YYYY (e.g., 08th Sep, 2024 or 8th Sep, 2024)
- MMM DDth, YYYY (e.g., Sep 08th, 2024 or Sep 8th, 2024)
- DD MMMM YYYY (e.g., 08 September 2024 or 8 September 2024)
- MMMM DD YYYY (e.g., September 08 2024 or September 8 2024)
- YYYY MMMM DD (e.g., 2024 September 08 or 2024 September 8)
- MMMM DD, YYYY (e.g., September 08, 2024 or September 8, 2024)
- DD MMMM, YYYY (e.g., 08 September, 2024 or 8 September, 2024)
- Correct the dates in your file to match one of these formats, and reattempt the import. Properly formatted dates ensure they are recognized and mapped successfully.
- Error: Invalid email address
Solution: This error occurs when the email address in your file does not follow a valid format (e.g., missing "@" or domain extensions).- Verify the format of all email addresses in your file.
- A valid email address should look like: example@domain.com.
- Correct any invalid email addresses in your file (e.g., fix typos, add missing parts).
- Reattempt the import with the corrected file.
- Verify the format of all email addresses in your file.
- Ensuring accurate email formats will prevent this error and allow for a successful import.
Additional Tips
- Double-check your file before importing to avoid errors.
- If you encounter any issues during the import process, refer back to this guide or reach out to our support team for assistance.


